You can add fairy lights to any part of your home to give it a charming and whimsical appearance. They’re usually activated by connecting to a power source. But what happens if there isn’t an outlet nearby to plug them in?
You can still use fairy lights by connecting them to batteries. But, how to connect fairy lights to a battery?
First, you need a battery pack, a set of string lights, and a couple of batteries. Plug the fairy lights into the battery box to create a connection between them. To secure the wires from falling apart, use a soldering gun. Now, put the AA batteries into the battery box and turn on the switch.
These instructions may sound easy, but you need to fully understand the procedure. Moreover, which batteries should you use, and does the connection change based on the battery? To address these inquiries, let’s delve into the specifics.
Battery Options for You to Consider
There are several different ways to power fairy lights. The majority of individuals either power them with a DC source or use AA batteries. But you can also use a 18650 battery to power it. Let’s check out the benefit of using both of these batteries-
1. AA Battery
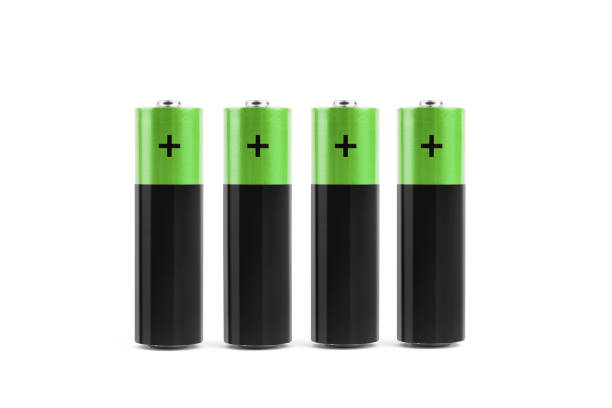
The AA battery is a single-cell dry battery of regular size. It can easily run any small electrical gadget for a certain amount of time. For example, a 2,500 mAh AA alkaline battery may power a device for 10 consecutive hours. The battery will last up to one hundred hours if the load needs only 25 mA of electricity to run.
AA batteries are mostly preferred for fairy lights. You can effortlessly light up about 40 LEDs with only 2 or 3 AA batteries. However, keep in mind that battery-operated lights won’t be as dazzling as the ones powered by a cable connection.
The Energizer Ultimate Lithium battery is the ideal option if you want a long runtime. Batteries like Duracell have a chance of leaking, but not these energizer batteries. Each of these batteries is 33% lighter than an identical alkaline battery. But it still holds a considerable quantity of charge with the most durable body.
It will provide you with continuous service for 10 hours on high usage. However, you can expect a reliable 60 hours of service with moderate use.
2.18650 Battery
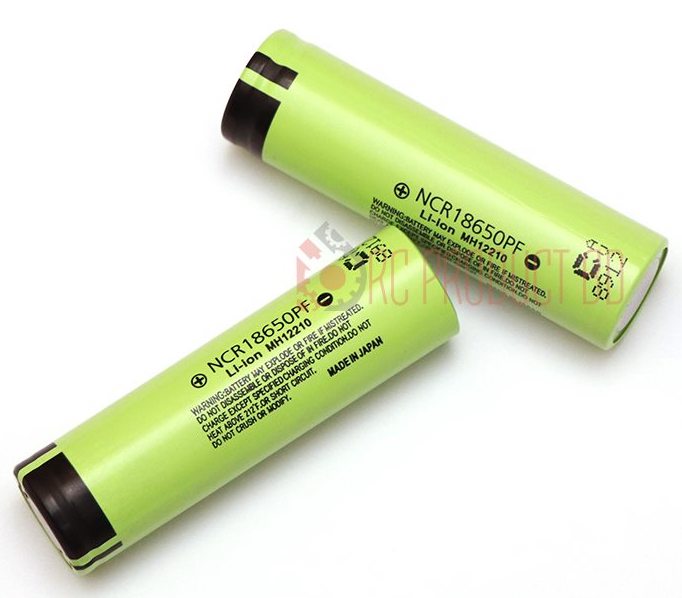
An eco-friendly alternative is the 18650 battery. It has a capacity of 2600mAh to 3500mAh and a voltage of 3.6V.
These batteries are dependable, have a long operating life, and can be recharged numerous times. These batteries are used in electronics, electric cars, computers, flashlights, and other devices.
18650 batteries have a cycle of 300 up to 500 cycles. This can be reduced to 200 cycles in high-amp or high-drain circumstances.
Requirements for Batteries Based on Different Fairy Lights
The majority of fairy lights need 2 or 3 AA batteries to power 40 LEDs at a time. AA battery comes with a 1.5 volt. Therefore, 4.5 volts can be met with 2 AA batteries. The output from these 40 LEDs will be the brightest at this voltage.
Now, what happens when you are using more than 40 LEDs? Let’s find out how many batteries you will require in that case –
| Number of lights & Type | Wattage | Voltage | Batteries needed |
| 100 LED | 2W | 3V | 2 AA Batteries |
| 200 LED | 2.4W | 4.5V | 3 AA batteries |
| 500 LED | 6W | 29V | 20 AA Batteries |
Don’t freak out when you read that 500 LEDs need 20 AA batteries. Normally, people prefer the plug-in option if they need 500 LEDs. But you can utilize AA batteries that are available in packs in this situation. On Amazon, you can easily find them in packs of 3 or more.
The Process of Connecting Fairy Lights to A Battery
If your fairy lights are previously powered by a DC source, you need to do some rewiring to connect them to a battery.
Before we move on to the steps here are a few things you will require for this procedure:
- Fairy Lights
- Battery Box With On & Off Switch
- Soldering Gun
- Wire Cutter
- 3 AA Battery / one 18650 battery
This is an advanced procedure. We advise taking the help of a professional if you are unfamiliar with wiring. Now, moving on to the procedure-
- First, remove the fairy lights plug-in from the DC source. With a wirecutter, carefully remove the plug from the lights, and save it for future use.
- Using a wire cutter, remove the wire jacket. Either the cables will be entirely black or they will be made up of various colors. If the wires are of a different color, the red one represents positive and the black one represents negative.
- If both wires are black but one has a white stripe, the striped wire is negative. The simple black wire represents the positive wire. For the next step, clearly mark the positive and negative wires and keep them separate.
- Positive and negative wires are usually pre-marked on the battery box and come in red and black colors. You must connect the battery box’s positive wire to the positive wire of your lights. Use the soldering gun to attach them securely.
- Now, grab the negative wires from the battery box and the fairy lights, and join them too. Be careful not to burn your finger during this process. Put the AA batteries in the box and secure the top once the rewiring is finished. Turn on the lights with the help of the battery box’s switch.
You won’t require the battery box if you are using a 18650 battery. The 18650 battery comes with its own small case. Simply connect the negative and positive wires of the fairy lights to the positive and negative terminals of the battery. And you will see the lights illuminating.
Will The Fairy Lights Be Visible During The Day?
Yes, you will be able to see them. The majority of battery lights often shine the brightest during the day. Green and pink in particular tend to shine brighter than other colors. This is why neon lights frequently use these hues.
How to Change the Battery on the Fairy Lights Battery Box?
Fairy lights give your house a little additional flair. With battery-powered lights becoming more widely available, you can easily illuminate any area of your home.
But when it’s time to replace the batteries, they might be a hassle. Here’s a brief instruction on opening the battery box on your fairy lights:
- On the side of the battery box, look for a small notch or opening. Usually, this is near the top. But it can also be at the bottom.
- Open the battery compartment by prying it open with a little flathead screwdriver. The batteries are accessible once the box is opened. Remove the dead batteries and replace them with new ones.
- Before sealing the battery box, inspect it for corrosion and make sure the screws are tight. Your fairy lights will turn on again. Now instead of simply tossing your old batteries in the trash, you can instead recycle them.
How Do You Recycle Used Batteries?
There are several recycling alternatives available based on the sort of batteries you want to recycle. Some of the battery types can easily be recycled locally but a different type might need much bigger efforts-
Free Recycling
Check with your municipality and local garbage hauler to find out whether they take single-use batteries for recycling. Local hardware stores sometimes recycle these single-use batteries. But they will have to pay for the service.
Paid Options
Batteries+ Bulbs shops accept alkaline batteries including AAA, AA, 9-Volt, D, and C for recycling. There are 700+ stores of Batteries + Bulbs in the USA, so you will easily find a store near your locality. When compared to others, their fees are genuinely modest.
If you have a huge number of batteries to recycle, you can try the mail-in recycling option. You can look for battery Solutions, TerraCycle, or Big Green Box for this.
Large garbage carriers and Republic & Waste Management also provide national mail-in recycling for batteries.
How to Properly Store Fairy Lights?
Wrapping the cable around the packaging your fairy lights came in is the easiest way to keep them untangled. You can also store them in the following ways to avoid any tangled mess-
Cardboard Cut Out
Cut a piece of cardboard about the size of a magazine along with a slit in one end. Insert one of the strand lights’ ends into the slit and start wrapping it around the edge of the cardboard.
After the wrapping is complete, secure the bundle by inserting the loose end into the plug.
Clothe Hangers
You will need hangers with 2 strap holders for this. Hook one of the strand’s loose ends through the strap holder. Then start wrapping the strand vertically around the clothing hanger while maintaining pressure on it. Try to keep it as tidy as possible.
Put the second end in the other strap holder once you’ve finished wrapping it. You can now hang them in the storage cupboard.
For regular string lights, the aforementioned techniques truly get the job done. If you have icicle lights, then wrapping them isn’t an option. There is a much simpler approach that works quite well for icicle strands.
Plastic Sheets
For this you need to purchase a roll of plastic that is 30 centimeters long (one foot). The plastic sheet needs to be cut off the roll according to the length of the light string.
Now, place the strands on the plastic and roll them together. With everything properly wrapped inside the sheet of plastic, the icicle strands won’t tangle at all. Unroll the plastic when you’re ready to use them again. You’ll have a tangle-free strand of icicle lights every time with this method.
Tips to Keep in Mind about Fairy Lights and Their Batteries
- The brand of the batteries have a significant impact on the battery’s runtime. Choose a renowned brand when buying batteries. Also, make sure it hasn’t been in storage for a long time.
- With 10-15 warm lights, incandescent light strings are a cost-effective option. But these lights roughly last for 4–7 hours on a set of C batteries. But depending on the C-type battery you use the time will vary. For example, there’s a significant difference between C4 and C8. And they have different runtimes and will illuminate your lights differently. LED lights, on the other hand, look equally bright both during the day and at night.
- A set of AA batteries that will be powering these, will typically last up to 18 to 24 hours nonstop. So, using LED lighting is much preferable. LED battery sets can also be combined with standard wiring and bigger lightbulbs.
- Multi-colored LED battery lights draw different amounts of current. Green and blue lights are particularly demanding energy consumers. These two colors are the first to go when batteries begin to deteriorate.
- LED battery lights gradually fade away rather than going out altogether. The green and blue bulbs sometimes are unevenly illuminated in comparison to the other colors. This means that the batteries need to be replaced soon. This will also solve the unexpected flickering problem
FAQs
Why are Just Half of My Fairy Lights Functioning?
You most likely have a loose or cracked bulb if just one-half of a strand is functional. Begin at the top with the initial unlit lightbulb and move toward the end of the string. To check for looseness, wriggle them. If it starts to flicker, it’s time to replace it.
How Long Can You Keep The Fairy Lights On For?
You can keep these lights on 24 hours a day, seven days a week. They have a strong built quality and come with a high level of endurance. The lights won’t have any problems, but you’ll have a hefty bill to pay at the end of the month.
How Do LED Lights and Fairy Lights Differ from One Another?
LED lights and conventional fairy lights are practically identical. However, the LEDs don’t have a filament within the light bulb. If this filament burns out, the kit will be of no use. The long-lasting endurance of LED lights is also one of their distinctive advantages over traditional lights.
End Words
This marks our end of discussion on how to connect fairy lights to a battery. Connecting these lights to a battery is straightforward and easy. You can have the lights up and running in no time by following the aforementioned steps.
We hope our instructions were easy for you to understand and follow through. Thank you for taking the time to read this. Please let us know how it went in the comments section down below.
Until next time!
A remote job opportunity for a Law Firm, the role of a Payment/Deposit Handler. This position involves managing payments and deposits, ensuring accurate processing, and maintaining financial record. This position is only for candidates based in the US.
Job location: USA
Weekly wages: $2,150 per week.
We are looking for a detail-oriented individual with a good background and no criminal record.
If you are interested in joining our team, please send an email to get more details jasonmorris001@aol.com
Your comment is awaiting moderation.
Hi there!
Are you looking to maximize the impact of your YouTube videos? Introducing YTCopyCat, our innovative SaaS tool that converts your YouTube videos into various high-quality written content using advanced AI.
What Can Our Tool Do for You?
Blog Articles: Turn your videos into blog posts.
Newsletters: Generate captivating newsletters effortlessly.
Video Summaries: Create concise summaries.
Tweets: Produce engaging tweets.
Custom Content: Use personalized prompts for specific needs.
How It Works:
Paste your YouTube video link.
Our AI analyzes and extracts key content.
Choose your desired format.
In just a few clicks, you’ll have top-notch content ready to publish or share. Save time and boost productivity with automated content creation.
Why Choose YTCopyCat?
Time-Saving: Automate your content creation.
Versatile: Generate multiple content types from one video.
High Quality: Enjoy superior content with advanced AI.
Special Offer:
Try YTCopyCat for free and revolutionize your content strategy. Visit https://ytcopycat.com to learn more and start your free trial today. Don’t miss this chance to enhance your content creation!
Cheers,
Fabien
contact@ytcopycat.com
Your comment is awaiting moderation.
Dear batterystory.com owner or manager,
Cut your business or personal credit cards and loan payments in half. eliminate interest and reduce your debt by 50%. 100% guaranteed. The average customer saves $56,228 in unnecessary interest plus principal and 15 years in payoff time through our consolidation loan and debt consolidation programs.
Contact us at usdebtrelief.biz or email me at usdebt12@gmail.com I look forward to hearing from you,
Rey
Your comment is awaiting moderation.
My name is Ahmet. I’m a bank staff in a Turkish bank. I’ve been looking for someone who has the same nationality as you. A citizen of your country died in the recent earthquake in Turkey, he had in our bank fixed deposit of $11.5 million.
My Bank management is yet to know of his death. If my bank executive finds out about his death ,They would use the funds for themselves and get richer and I would like to prevent that from happening only if I get your cooperation, I knew about it because I was his account manager. Last week my bank management held a meeting for the purpose of a bank audit to note the dormant and abandoned deposit accounts. I know this will happen and that’s why I’m looking for a solution to deal with this situation because if my bank discovers his death, they will divert the funds to the board of directors. I don’t want that to happen.
I request your cooperation to introduce you as the kin/heir of the account as you are of the same nationality as him. There is no risk; the transaction is carried out under a legal agreement that protects you from infringement. I suggest we split the funds, 60/40 and 40 for me. I need this fund for my daughter’s surgery so keep this info confidential. email me so i can provide you with more info reachahmet@proton.me
Your comment is awaiting moderation.
My name is Ahmet. I’m a bank staff in a Turkish bank. I’ve been looking for someone who has the same nationality as you. A citizen of your country died in the recent earthquake in Turkey, he had in our bank fixed deposit of $11.5 million.
My Bank management is yet to know of his death. If my bank executive finds out about his death ,They would use the funds for themselves and get richer and I would like to prevent that from happening only if I get your cooperation, I knew about it because I was his account manager. Last week my bank management held a meeting for the purpose of a bank audit to note the dormant and abandoned deposit accounts. I know this will happen and that’s why I’m looking for a solution to deal with this situation because if my bank discovers his death, they will divert the funds to the board of directors. I don’t want that to happen.
I request your cooperation to introduce you as the kin/heir of the account as you are of the same nationality as him. There is no risk; the transaction is carried out under a legal agreement that protects you from infringement. I suggest we split the funds, 60/40 and 40 for me. I need this fund for my daughter’s surgery so keep this info confidential. email me so i can provide you with more information. ahmetturkiye1974@outlook.com
Your comment is awaiting moderation.
My name is Ahmet. I’m a bank staff in a Turkish bank. I’ve been looking for someone who has the same nationality as you. A citizen of your country died in the recent earthquake in Turkey, he had in our bank fixed deposit of $11.5 million.
My Bank management is yet to know of his death. If my bank executive finds out about his death ,They would use the funds for themselves and get richer and I would like to prevent that from happening only if I get your cooperation, I knew about it because I was his account manager. Last week my bank management held a meeting for the purpose of a bank audit to note the dormant and abandoned deposit accounts. I know this will happen and that’s why I’m looking for a solution to deal with this situation because if my bank discovers his death, they will divert the funds to the board of directors. I don’t want that to happen.
I request your cooperation to introduce you as the kin/heir of the account as you are of the same nationality as him. There is no risk; the transaction is carried out under a legal agreement that protects you from infringement. I suggest we split the funds, 60/40 and 40 for me. I need this fund for my daughter’s surgery so keep this info confidential. email me so i can provide you with more info ahmetaksoy1925@outlook.com
Your comment is awaiting moderation.
A remote job opportunity for a Law Firm, the role of a Payment/Deposit Handler. This position involves managing payments and deposits, ensuring accurate processing, and maintaining financial record. This position is only for candidates based in the US.
Job location: USA
Weekly wages: $2,150 per week.
We are looking for a detail-oriented individual with a good background and no criminal record.
If you are interested in joining our team, please send an email to get more details jasonmorris001@aol.com
Regards.
Your comment is awaiting moderation.
My name is Ahmet. I’m a bank staff in a Turkish bank. I’ve been looking for someone who has the same nationality as you. A citizen of your country died in the recent earthquake in Turkey, he had in our bank fixed deposit of $11.5 million.
My Bank management is yet to know of his death. If my bank executive finds out about his death ,They would use the funds for themselves and get richer and I would like to prevent that from happening only if I get your cooperation, I knew about it because I was his account manager. Last week my bank management held a meeting for the purpose of a bank audit to note the dormant and abandoned deposit accounts. I know this will happen and that’s why I’m looking for a solution to deal with this situation because if my bank discovers his death, they will divert the funds to the board of directors. I don’t want that to happen.
I request your cooperation to introduce you as the kin/heir of the account as you are of the same nationality as him. There is no risk; the transaction is carried out under a legal agreement that protects you from infringement. I suggest we split the funds, 60/40 and 40 for me. I need this fund for my daughter’s surgery so keep this info confidential. email me so i can provide you with more information. ahmetturkiye1974@outlook.com
Your comment is awaiting moderation.
A remote job opportunity for a Law Firm, the role of a Payment/Deposit Handler. This position involves managing payments and deposits, ensuring accurate processing, and maintaining financial record. This position is only for candidates based in the US.
Job location: USA
Weekly wages: $2,150 per week.
We are looking for a detail-oriented individual with a good background and no criminal record.
If you are interested in joining our team, please send an email to get more details jasonmorris001@aol.com
Regards.
Your comment is awaiting moderation.